Train Repainting - Create Your Own Liveries
Introduction
With train repainting you can create your own liveries for train vehicles. You can draw anything you want in your liveries, from creating your own railroad company to mess it up with graffiti.
Repainting works by downloading a repaint kit for a train vehicle, which is only a black and white standard PNG image. This image contains a scheme of how painting is mapped over the final 3D model. Use it as a guide to draw your repaint. The 3D models have been created such a way that this mapping is reasonably easy to understand and repaint.
You can open the repaint kit with your favorite image editor (GIMP, Inkscape, Photoshop…), then draw your livery over it. You can use layers to simplify this process. We encourage you to try a vectorial image editor like Inkscape, it's really useful for drawing liveries. When you finished drawing your livery, save it as a standard PNG image, then upload to a livery slot on the matching vehicle. That's all.
If you are not familiar with any image editing software, the main difficulty for you will be learning this software. We choose this procedure because it gives you the power of professional image editing tools. This is a flexible way of drawing liveries. In fact, we do it this way.
How livery slots work?
- Every vehicle has eight livery slots. They are all filled with the default liveries, but you can change any of them with your own liveries.
- When inside the simulation, you will see your liveries instead of the default ones in all trains. That is: your train, AI trains, and other player's trains will show your liveries.
- Your liveries will remain private to you. Others, in their simulations, will see their own liveries if they have changed them, or the default ones if not.
What can you do with your liveries?
The liveries you create are your property and you are the copyright owner. You can keep them private, share them on forums or social media, sell them from your website... it's up to you.
Repainting Tutorial
Here we will do a repaint of the “Boxcar - 50ft 6270cu-ft Hi-Roof” vehicle, one of the easiest cars to repaint. Here we are using Inkscape as image editor, a free vectorial image editor. Of course you can use other tools, like GIMP (also free software), Photoshop, or any other image editor that supports PNG format. The procedure described in this tutorial will be similar on most image editors.
- We start downloading the repaint kit. Log in, then go to “repaint” page → “Available repaint kits” section.
- Download “Boxcar - 50ft 6270cu-ft Hi-Roof” and save to a folder in your computer.
- Open the downloaded PNG file with Inkscape. Do not use “import”, it's better to use “open” because the page size will be adjusted to the PNG aspect ratio.

- Create a new layer named “guide”. Then select the opened image (by clicking over it) and use Menu → Layer → Move Selection to Layer, then select the “guide” layer. We now have the repaint kit inside this “guide” layer. We can lock this to avoid accidentally editing it, or hide/show it by clicking on the eye icon.
- Now create a new layer named “repaint” below the “guide” layer. This way we can see the guide while repainting.

Now we can paint comfortably. You can use all the tools that Inkscape provides to create your livery.
- Fist step is to choose the base color, and fill all the page with a rectangle of this color. This is because there are lots of faces mapped all over the image, the repaint kit shows guides only on the more interesting and easy parts, but the entire image must be painted.
- Hint: You will get better results by choosing a dark color here.
In this tutorial, a dark olive green will be used as base color.

After that, we painted the car lateral with yellow, added a white strip with black borders and some text and markers. Note that you can use raster images on top of vectorial draws with Inkscape. A dirt image with the same lateral yellow has been used to create the effect of worn paint. Also, some vandals have worked on the train leaving ugly graffiti. Finally, the areas for some labeled parts have been filled with different colors: the handrails with a desaturated red, metallic parts will be gray, and the stirrup steps use the base color.
As you see, it's not required to draw dirt, shadows, light effects and this kind of stuff. All will be added automatically at a later process. Technically speaking, your livery is providing the albedo map. Of course, you are free to draw dirt to recreate an older car.

Now you are ready to export your livery to a PNG image. The default Inkscape image format is SVG, this is a vectorial image format that is not valid for our liveries. This is why you must “export” instead of “save” to produce the uploadable livery.
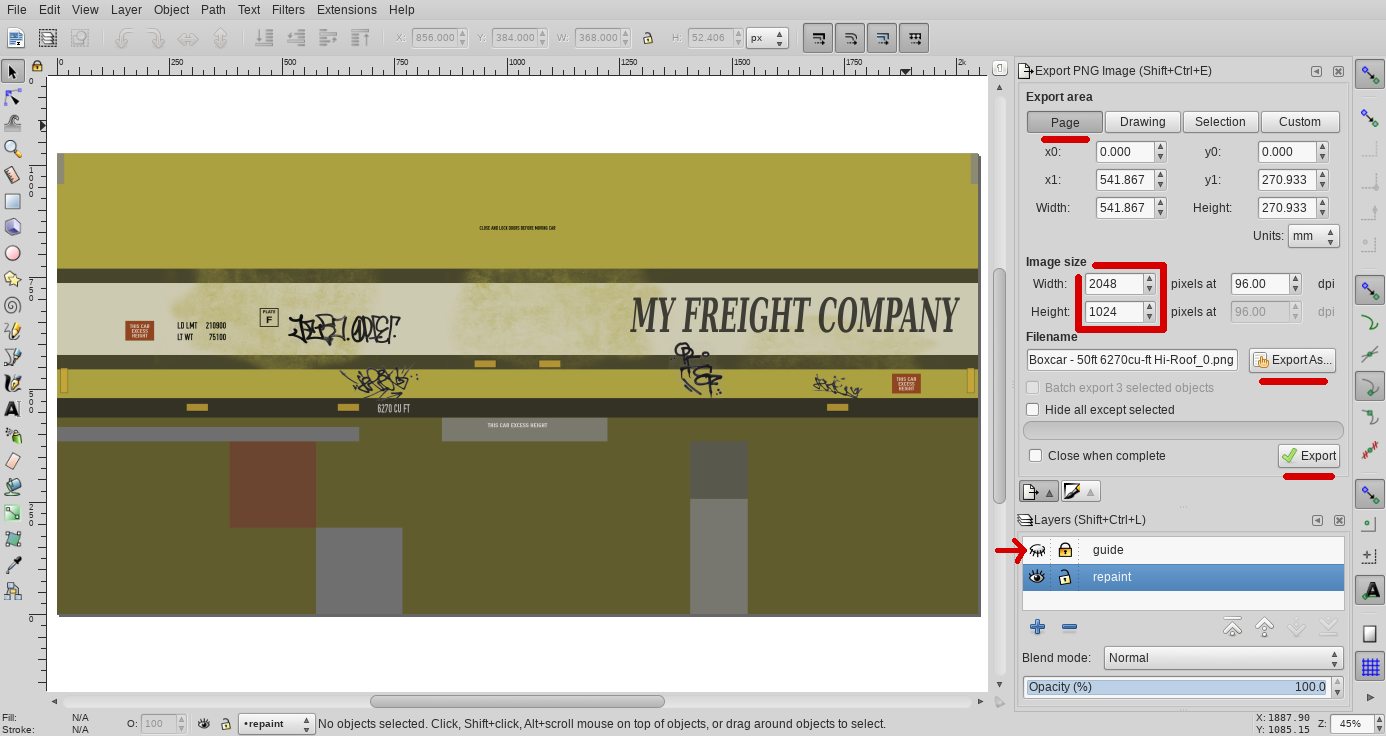
- First step is to hide the “guide” layer, by clicking the eye icon left to the layer name. It is really important in order to avoid your livery to be filled with black lines.
- Choose Menu → File → Export PNG Image.
- Select “Page” for “Export Area” to export the full image.
- Ensure that Image Size is the same as the downloaded repaint kit PNG. This boxcar must be 2048x1024 pixels, but other vehicles will require different image sizes.
- Use the “Export As...” button to select the file name, and click “Export” to perform the export.
- You can save it with any name useful to you.

You are done with Inkscape.
- Now go to the RunOnRails.com website, log in, go to “repaint” page, and there to the “Livery Uploader” section.
- Select the matching vehicle in the first dropdown, in this case “Boxcar - 50ft 6270cu-ft Hi-Roof”.
- Choose any slot (#0 in the example).
- Choose the PNG file you just exported.
- Click the “Upload” button.

After several seconds, the page will reload and your new livery will be displayed in the “Your liveries” section.
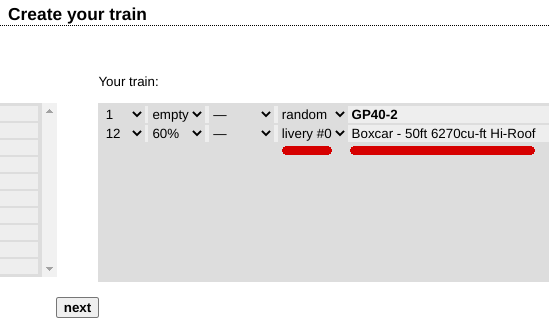
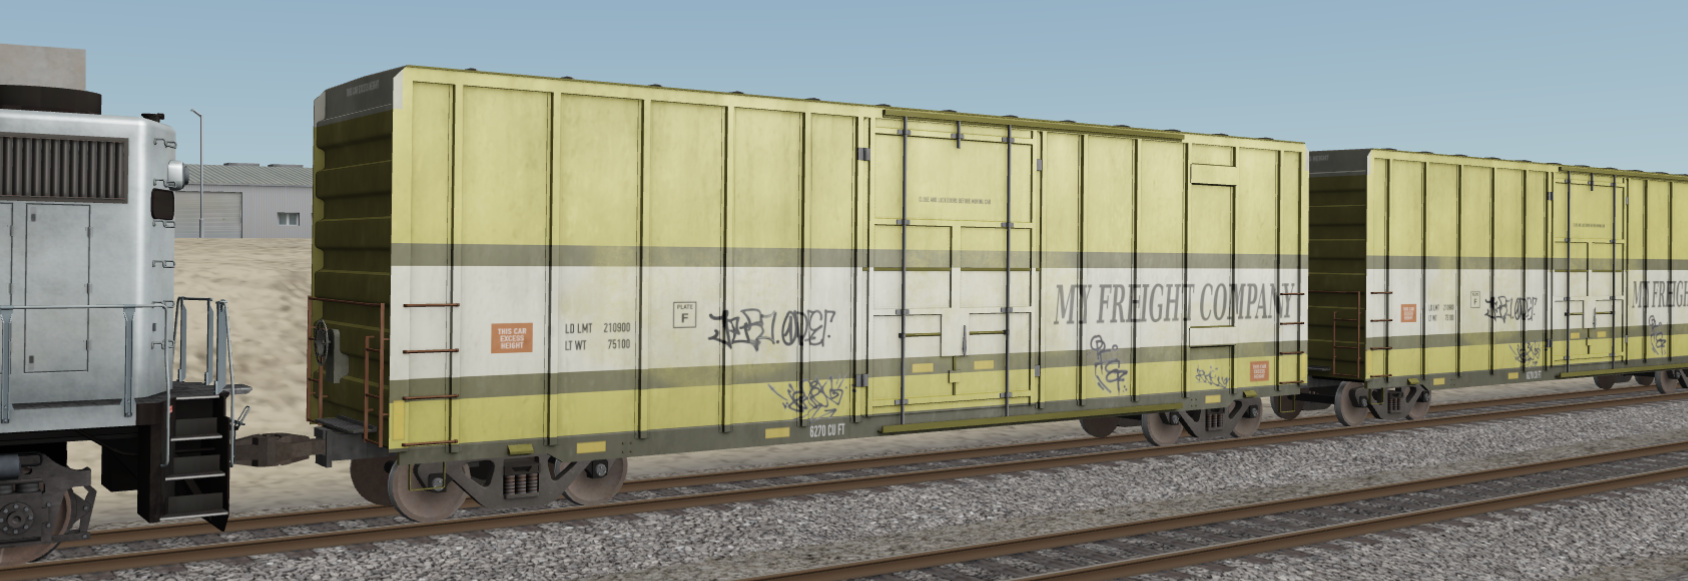
Now you will see this livery on all trains that haul this vehicle/livery pair. If you want to test your livery, you can create a custom task and create a train with this vehicle and livery.

Voilà the result of this tutorial:

